|
World Machine Tip of the Month : Tuesday, April 29th, 2003.
#5: An Introduction to Macros
|
|
PART 2: CREATING A MACRO
Establishing a macro
A maro contains it's own device workspace, called the Macroworld. This is a seperate worksheet that communicates with the main world only by way of its inputs and outputs. You can nest macros within macros within macros, for any level of complexity you desire.
The easiest way to setup a macro is to first design the device network you want to have inside of the macro like usual.
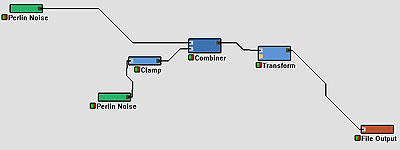
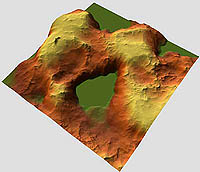
Below, you can see a small network and its output. The parts grouped in the center will become the macro.
Making the macro is easy as 1-2-3
- Setup your device network like usual
- Select all devices you want to put inside the macro
- Right click on any of the selected devices, and choose "Create Macro". You can also go to the Commands menu and choose "Convert Selected Devices to Macro..", or hit Ctrl-M -- the three methods are equivelent.
All of the selected devices will blink out of this world, replaced by a single "black box" (a grey box, actually!) named Macro. It will have a number of inputs and outputs consistent with the number of wires needed to communicate with those devices that are staying outside of the Macro world. WM will automatically route the new wires so that the new macro device is hooked up identically to how your network was.
Saving your macro
At this point, let's see how you can save the macro you've created.
- First of all, name the device with some inspired name by the usual methods (Ctrl-doubleclick, RightClick-SetName, or the leftbar-Name command).
- Then with the device selected, choose "Save device to Library" from the "Commands" menubar.
- It will prompt you for your name as the author, and then a short description. Enter whatever you want, and hit OK.
- The Macro will be saved to the library. Verify this by pulling up the Load from Library dialog, and you should see your macro in that list, and can load it like any other.
This is great at first. Inevitably though, we will desire to make some changes to the devices we put into the macro world. Find out how we can do that on the next page!
Tutorial by Stephen Schmitt. 4/29/2003.