Category: Terrain Effects |
Difficulty: Beginner/Intermediate |
Author: Stephen Schmitt |
World Machine Tutorial #1: Impact Craters
|
Summary: Beginning with a simple model and then adding progressively more sophisticated touches, you will learn a technique for creating a cratered terrain surface in World Machine.
|
Whether its the pockmarked barren surface of the moon or a massive terrestrial meteor crater, impact craters can add a very unique twist to the surface of a planet. We'll look at a couple methods of creating craters on the existing terrain of your world, as well as how best to blend the crater into the existing terrain to simulate old or recent meteor activity.
As we step through the creation process, we'll look at exactly what to do in World Machine that would create the features that we need to represent. As a convenience, at the end of the tutorial you can also download the World Machine Terrain File that shows all of the techniques mentioned here.
Method One: Hero Craters
A "Hero" crater is an individually positioned unique crater. This is the kind of crater that might be found on Earth or another planet with an atmosphere and active geological processes that erase impact craters from the landscape over time.
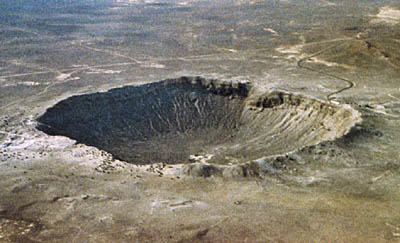
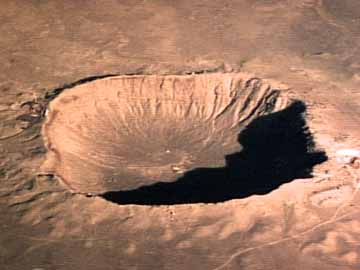
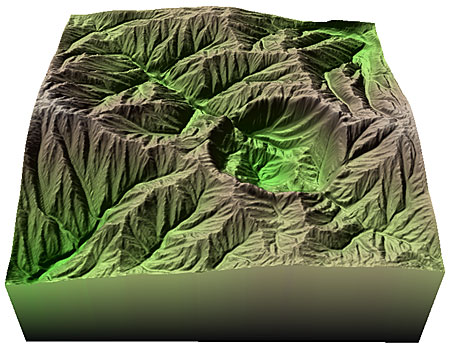
Let's take a look at some real life terrestrial craters:
Some points to notice for our modelling attempt about the above images:
Crater Shape: The Craters are remarkably -- but not perfectly -- circular in appearance. The wall profile looks something like a scaled "inverted hemisphere".
Crater Rim: Ringing the crater hole itself is a blast rim of raised land, that is sharp at the edge of the crater and tapers off gradually to the surrounding land.
Erosion: Since these are terrestrial craters, geological processes act to erase the presence of the crater from the landscape over time. You can clearly see gullies and slumping happening on the sides of the crater wall, slowly producing a shallower crater.
Approach to Terrain Modelling
The first thing to realize is that there are many, many ways to create a given effect in World Machine. It may well take several tries using different methods before hitting upon a technique that works well in reproducing the effect you want.
To complicate matters, some of the most useful tools for modelling specific landforms are only available in the Standard Edition and above. In this tutorial I will show how to work around the limitations of the Basic Edition where possible.
The Starting Terrain
|
Let's create a basic terrain that we'll use to create our meteor impact crater upon. A Perlin Noise device set to "Billowy" and an Erosion device set to the "Flood of Slurry" preset creates the terrain shown below.
|
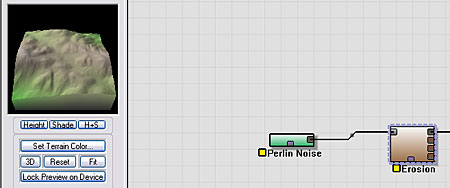 |
The Crater Shape
|
The basic crater shape will be created by a Radial Gradient device. This device can produce a cone shape. You can position it anywhere in the world that you want it by using the Transformation section of the Dialog. You can also control how large the crater will be with the "Radius" property of the device.
|
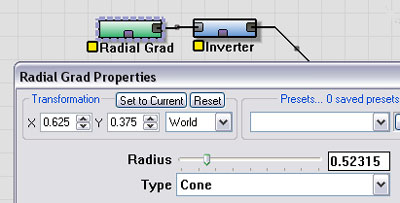
|
|
Next we'll use an Inverter device to invert the shape to create your garden-variety hole in the ground.
|

|
| Your next step will depend on if you are using the Standard or Basic edition of World Machine. |
|---|
| STANDARD EDITION |
|---|
|
Connect the output of the Inverter to a Curves device, and draw a curve that looks like the one shown here. The curve view shown here essentially is a profile view of what the sides of the crater will look like. It has steeply sloping sides, a noticable rim and then a gentle falloff to the surrounding terrain.
Examing the 3D Preview, you can see that our basic crater shape is now formed; all that remains is to imprint it onto the terrain.
|

|
| | |
| BASIC EDITION |
|---|
|
Connect the output of the Inverter to a Height Selector device, and set the device parameters as shown here. Essentially, we are using the selector to pick out the rim of the crater. By using the falloff set to maximum, and falloff mode set to "Exponential", the crater has a slope that is approximately correct.
If you compare the 3D Preview of this crater to the Standard Edition version using a handdrawn curve, you can see that it is quite similar!
|
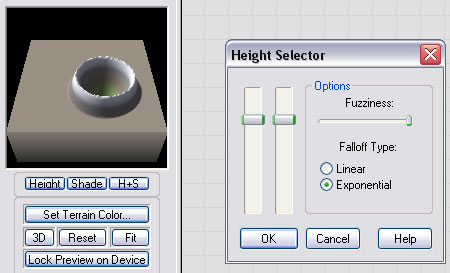
|
Imprinting the Crater onto the Terrain
|
Our crater and the source terrain are both defined "positively". In other words, the terrain and the crater are both oriented to look like what we envision the final result to be. Thus, to combine them we will need to add or average them together. A different way of creating craters might have the crater defined "negatively", and then we could subtract it out from the terrain. They are simply different ways of producing a similar result.
Here you can see that we have wired both the source terrain and the crater into a Combiner device set to Average mode.
|
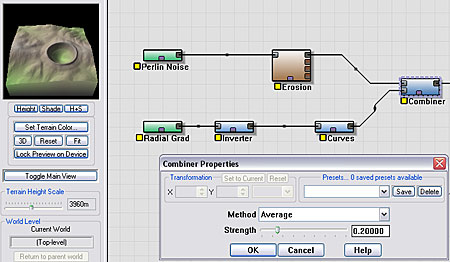
|
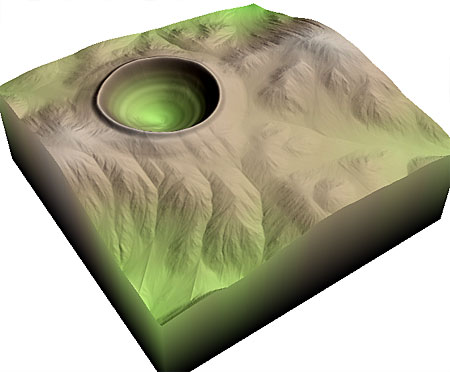
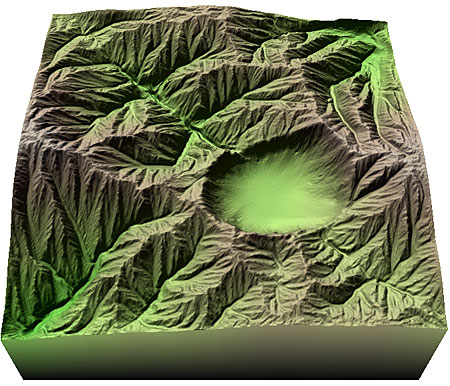
| This is getting pretty close to what we want! For a quick crater off in the distance, we could stop here. But for a true "Hero" crater that will be in maximum detail in the foreground, we need to do even better. There are definitely some details that we can improve on.
|
Improving Crater Realism
STANDARD EDITION ONLY: Removing Underlying Detail from Inside the Crater
|
|---|
|
Although it is somewhat difficult to see with our choice of basic terrain, our method of cratering does NOT wipe out the original terrain shapes inside of the cratered zone. This can result in a very strange looking crater, as the impact of the crater should have erased those details from the blast zone. If we want erosion detail from post-impact erosion, we should add that in later, just like Mother Nature does.
To the right you can see our crater applied to a more mountainous terrain.
(As an aside, the only difference between this terrain and the previous one used was that the Erosion device is now set to the "Classic WM + Power" preset. The erosion device is VERY powerful!) |
|
|
Not good. The mountain landforms are still clearly present inside the blast zone. Luckily, this is something that can be very easy to fix!
The solution is to smooth away the terrain details inside of the blast zone.
|
|
We can use the Blur device in the Standard Edition to quickly smooth away the interior of the crater.
The steps to do are:
- Wire a Blur device to the output of the Combiner used above.
- Splice a Splitter device into the network between the Inverter and the Curves devices you have already created.
- From the second output of the Splitter device, add a Height Selector device that is connected to the Mask Input of the Blur device.
Whew! When describing World Machine networks, a picture is usually worth a thousand words.
|

|
|
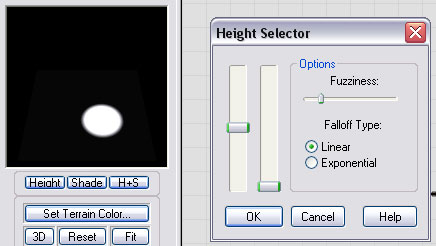
Here you can see the settings used for the Height Selector:
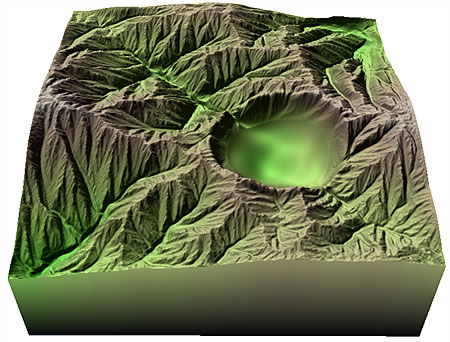
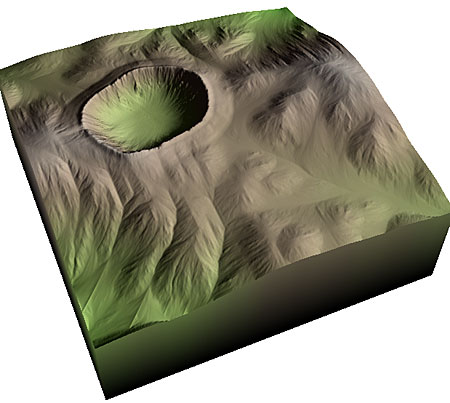
Notice how the output of the height selector has masked out the area of the inside of the crater. By applying this to the Mask Input of the Blur device, we have contained the blurring effect to happen only inside the crater. The Blur device should be set to a blur radius that matches your artistic preference.
|
|
|
The result:
|
|
|
|
| |
Other Realism Additions |
|---|
|
There are many things you can do to increase the realism of your Hero crater. Many of these are relatively simple additions, and make good exercises in using World Machine. Here's a small, partial list:
- Blasted Area: If simulating a fresh impact onto the terrain, you might want to add some fine noise to the smooth areas to simulate the rough, blasted rock, or use a texturing mask and have your renderer do so. Alternatively, you may wish to erode the entire landscape again to simulate an aged crater.
- Irregular Circle: Although craters are very circular, they are rarely perfectly circular like ours. Adding a little bit of "wiggle" to the circular shape of the crater can help with realism quite a bit, especially when the crater impacts otherwise flat areas. You can do this by adding a Simple Displacement device after the Circular Gradient that defines the crater shape.
- Parameter Tuning: The "correct" settings for the crater shape and the crater combiner amount are going to vary with the source landscape that you are impacting it upon. Like many things in World Machine and Computer Graphics in general, small changes in parameters can cause some quite dramatic changes in the resulting image.
|
|
Here's an example of the two terrains we've been working on with the above modifications.
|
|
|
|
You can download the World Machine datafile for this world here:
|
|
Method Two: Many Impact Craters
Sometimes we don't want a single crater -- instead we want an entire field littered with them.
It would be tedious at best to create the dozens or hundreds of craters visible above individually in World Machine!
If we take the device network that we developed above for our hero crater, we could keep everything the same and achieve many craters if we just had a device that could make radial-gradient shapes all across the terrain.
There are a few ways of doing this, but currently one of the best choices is to use some advanced features of the Voronoi Noise device.
| |
|
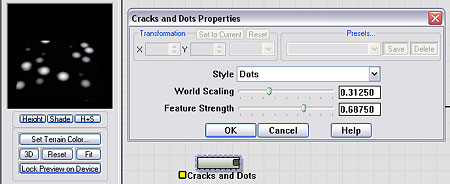
The Voronoi device is capable of creating polka-dot patterns that will be ideal for us to base our crater on. For convenience, I have created a macro called Cracks and Dots that can create a polka-dot pattern. You can download the macro directly from here (Cracks and Dots.dev).
Those curious can simply open the macro up and look inside to see how the dots are made. Essentially it is just the F1 noise type of the Voronoi device, clamped appropriately so that the dot features appear.
|
|
|
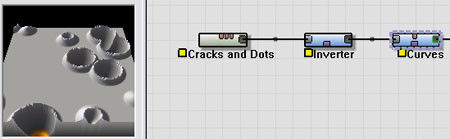
The output of the Cracks and Dots macro is sent through an Inverter so that we have a field of circular depressions rather than circular lumps. Then the output is sent to the exact same Curves device that we used earlier to create our crater shape. You can see that the result is craters very similar to the Hero Crater we developed earlier -- except there are many of them, automatically generated, stretching out as far as you can see.
|
|
|
Using the network we developed in Part One, and replacing the Radial Gradient with the above, we have the following network:
|
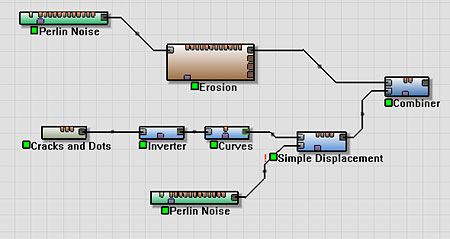
|
|
Which looks like this:
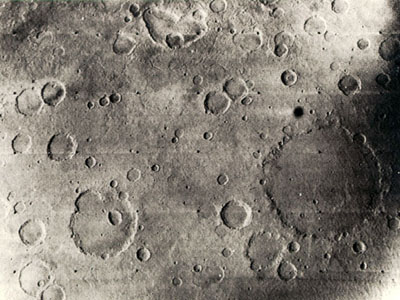
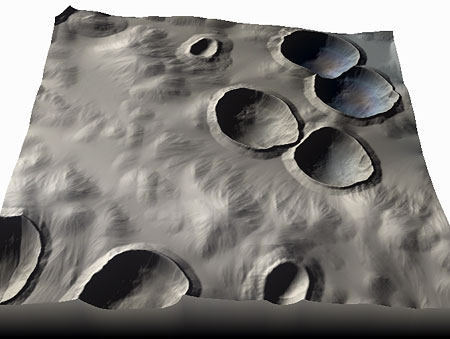
However, we can still do better. If you look at the lunar images from the start of this section, you'll see that there are many different sized impact craters, from large basins to tiny impacts.
|
|
To create the same effect, we will:
- Copy and paste multiple times the part of the device network dealing with crater creation.
- Set the Cracks and Dots device to a different feature size for each copy.
- Average together all of the results using Combiner devices.
|
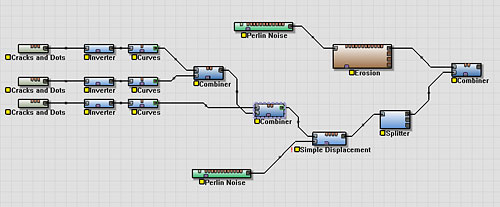
|
|
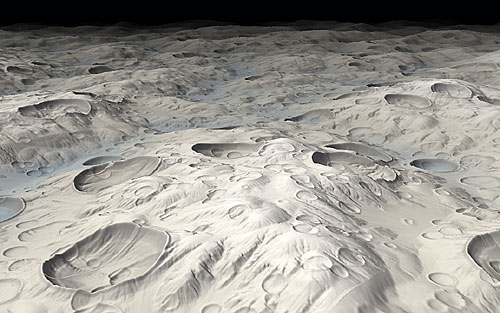
Here's our final result:
|
|
You can download the World Machine datafiles for this world here:
|
|